If your heating bill climbed again this winter, you’re not alone. Many homeowners waste energy by heating rooms they’re not using or cranking radiators to uncomfortable levels. Smart radiator thermostats offer a practical solution: they let you control individual radiators from your phone, program heating schedules, and automatically adjust temperature based on occupancy or time of day. Whether you’re looking to trim utility costs or simply gain better comfort control, understanding how these devices work and how to choose one for your space is the first step toward a smarter, more efficient home heating system.
Table of Contents
ToggleKey Takeaways
- Smart radiator thermostats enable individual room temperature control via smartphone or voice commands, allowing homeowners to achieve 10–15% reductions in annual heating costs by eliminating wasted heat in unused spaces.
- Installation is DIY-friendly for most homes, requiring only basic tools and 10–20 minutes per radiator when using standard M30 × 1.5 mm valve connections without system draining.
- Smart radiator thermostat selection should prioritize compatibility with your radiator type, connectivity protocol (Wi-Fi, Zigbee, or Z-Wave), temperature accuracy of ±0.5°C, and battery life of 12–24 months to ensure reliable performance.
- Automation features like geofencing, motion detection, and learning schedules remove manual adjustment burden and unlock convenience features that integrate seamlessly with existing smart home ecosystems.
- With costs ranging from $40–$120 per unit, smart radiator thermostats typically pay for themselves within 2–4 years through energy savings, making them a practical complement to an efficient home heating strategy.
What Are Smart Radiator Thermostats and How Do They Work?
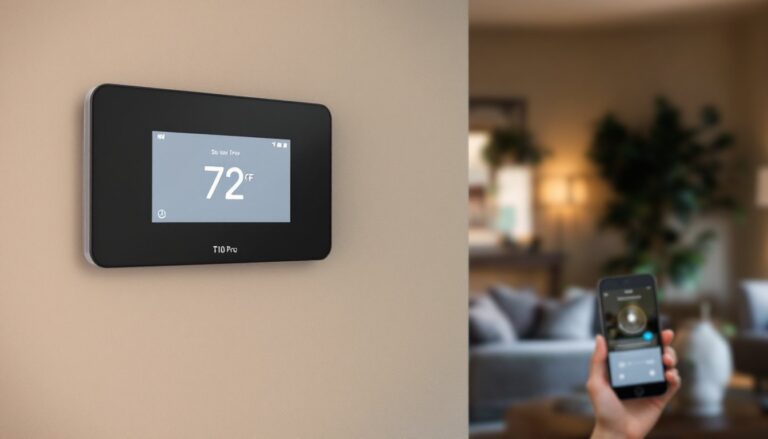
A smart radiator thermostat is a connected device that replaces or works alongside your standard radiator valve. Instead of manually adjusting the valve lever up and down, you control temperature electronically, either from a wall-mounted app, a smartphone, or through voice commands via Alexa or Google Home.
Most smart radiator thermostats use a motorized valve actuator that opens or closes the flow of hot water into your radiator. A built-in sensor detects the room’s current temperature and compares it to your desired setpoint. When the room reaches temperature, the valve closes slightly or completely: when it drops below your target, the valve opens again to let more heat in. This constant micro-adjustment keeps your room at your chosen temperature without the on-off extremes of older systems.
These devices typically connect via Wi-Fi, Zigbee, or Z-Wave, depending on the brand. Some models work standalone: others require a central hub or a bridge to communicate with your network. Installation usually involves removing your old valve and screwing on the thermostat body, no soldering or draining your heating system required for most retrofit models. The battery-powered actuator then sits on top of your radiator’s inlet valve.
Key Benefits of Upgrading to Smart Radiator Control
Energy Efficiency and Lower Heating Bills
The biggest draw of smart radiators is cutting wasted heat. Instead of heating an empty bedroom all day, you can set that radiator to a lower temperature or turn it off entirely. Many users see 10 to 15 percent reductions in annual heating costs by zoning their homes and scheduling heating around occupancy patterns. Over a season, that adds up, especially if your home has multiple rooms you don’t use constantly.
Programming is straightforward: set the living room to 72°F on weekday mornings, drop it to 66°F during work hours, then return to 72°F by evening. Bedrooms might stay at 68°F overnight. Because these adjustments happen automatically, you avoid the mental math of manually tweaking radiators. Remote control also means you can preheat your home before arriving without keeping the system running all day.
Enhanced Comfort and Convenience
Smart radiator thermostats let different rooms reach different temperatures simultaneously. Your home office might be toasty at 72°F while the guest bedroom stays at 65°F, no more fighting over the central thermostat. Family members with varying comfort preferences all win. If you realize you’re away longer than expected, a quick phone tap lowers temperature across the house, preventing unnecessary heating while you’re gone.
Convenience extends to automations. Many systems learn your routine and suggest schedules, or they integrate with other smart home devices. If your Zigbee motion sensor detects no movement in a room for 30 minutes, the radiator can drop its setpoint automatically. Geofencing also works: your phone’s location triggers a “away mode” that reduces heat throughout the house.
Installation and Setup for Homeowners
Smart radiator thermostat installation is straightforward for most homeowners, but a few prerequisites matter. First, confirm your radiators accept standard M30 × 1.5 mm valve connections, the most common European and increasingly North American standard. Older cast-iron radiators or systems with non-standard valves may need adapters or a professional’s help.
Before you start:
• Turn off your heating system at the boiler to avoid scalding water spraying out.
• Drain down if your model requires it (many modern retrofit thermostats don’t, which is a huge advantage).
• Gather tools: adjustable wrench, tape measure, small flathead screwdriver, and the thermostat’s installation bracket.
• Check your Wi-Fi signal in the rooms where you’ll place thermostats: weak coverage means sluggish responses.
Installation steps:
- Unscrew the old valve head (some twist counterclockwise: check your radiator’s design).
- Clean the valve thread with a dry cloth to remove any scale or debris.
- Apply plumber’s PTFE tape (also called Teflon tape) around the thermostat body’s thread, typically 3 to 4 wraps clockwise.
- Screw the thermostat body onto the valve, hand-tight first, then snug with a wrench (don’t over-tighten: you can crack the valve seat).
- Insert batteries into the motor unit and attach it to the thermostat body per the manufacturer’s instructions.
- Download the app, create an account, and follow the pairing prompts to add the device to your network.
- Power the heating system back on and let water circulate: bleed any air from the radiator if needed.
Total time is typically 10 to 20 minutes per radiator. If your system uses micro-bore pipework (thin copper tubing) or has valves in tight spaces, professional installation is worth considering. Similarly, if you’re unsure about water pressure or system components, a plumber’s pre-visit assessment prevents costly mistakes.
Choosing the Right Smart Radiator Thermostat for Your Home
Not all smart radiator thermostats are created equal. Here’s what to prioritize:
Compatibility and Connectivity
Check that the model matches your radiator valve type (M30 is the standard: ask at the supplier if unsure). Confirm it works with your home’s wireless protocol, Wi-Fi is the simplest but drains batteries faster: Zigbee and Z-Wave are more efficient but require a hub or a compatible router. If you’re heavily invested in a smart home ecosystem (all Amazon devices, Google Home, Apple HomeKit, etc.), verify the thermostat integrates natively or through a workaround.
Accuracy and Response Time
Look for thermostats with ±0.5°C temperature accuracy and a motor response time under 30 seconds. Cheaper models sometimes overshoot (heating past your target then cooling down), wasting energy. Reviews on dedicated smart home sites mention real-world performance: independent reviews of top smart radiator valves often highlight which models respond quickly and which tend to lag.
Battery Life and Power Options
Battery-powered models typically last 12 to 24 months on 2 AA batteries. If a thermostat runs out of power mid-winter, it’ll lock at the current position (usually open, allowing heat through, a safety feature). Some premium models offer optional AC power adapters if battery life worries you. Rechargeable options exist but are less common.
App and Interface
The app should be intuitive, setting schedules, viewing temperatures, and adjusting setpoints in under three taps. Clunky interfaces defeat the purpose of going smart. Free apps without paywalls are preferable: some brands charge subscriptions for advanced features like geofencing, which is frustrating for a home automation device.
Build Quality and Warranty
Premium brands typically offer 2 to 5 year warranties and use heavier materials, reducing failure risk. Budget models save money upfront but may not survive repeated heating cycles or hard water mineral buildup in the valve seat. Comparisons in smart radiator valve reviews break down durability and user satisfaction across price tiers.
Cost Considerations
Smart radiator thermostats typically cost $40 to $120 each, depending on features and brand reputation. A three-radiator setup might run $150 to $350 total. While that’s an investment, energy savings of 10 to 15 percent over a heating season often recover the cost within 2 to 4 years. Higher price doesn’t always guarantee better performance, read recent user reviews and compare actual return-on-investment timelines before buying a premium option.
Conclusion
Smart radiator thermostats are mature, reliable technology that genuinely cuts heating waste and improves comfort. They’re not a replacement for good insulation or air sealing, those still come first, but they’re a powerful complement to a comprehensive energy strategy. Installation is manageable for most homeowners, apps are increasingly user-friendly, and payback periods are realistic. If individual room control and remote scheduling appeal to you, and your radiators support standard valves, upgrading is a worthwhile DIY project that pays dividends season after season.